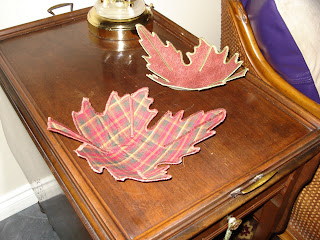
I've completed three leaf bowls for the CQA, the talented Jill Buckley designed the patten & guilds from across Canada have made them for the CQA Dinner at the Great Hall on the UWO campus.
It was a fun pattern with a lot of satin stitch & I was quite surprised at how quickly they came together.
These are so versatile, decorative, & reversible!
Wednesday, March 16, 2011
Monday, March 14, 2011
Green Pillows!
As you can see I'm still working with green...
I had a piece of green toile fabric, so I made quilted fabric from it using my batting scraps & scrap fabric for the backing (polyester/cotton broadcloth works well & is inexpensive), centering the main medallion. The pillows seem much nicer if the front is lined or quilted. The use of green painters tape for griding is my favourite method. Start by placing the tape diagonally corner to corner & evenly placed outward from there. The tape helps to keep the grid even & is reusable to use in the other 45 degree direction. I was able to use the same tape to mark the grid on both pillows. Then made a pair of flange pillows with green braiding to highlight the center & hide the start & stopping of the quilting stitches. The back is a more contemporary green stripe fabric, with a Velcro closing.
St. Patty's Postcards
Sharing the love of St. Patty's Day on the east coast...
I made & sent out postcards to some friends for St. Patrick's Day, using Boris, my Boston Terrier in some.
It's nice to get something in the mail other than bills...should bring some smiles!
They're fused appliquéd, machine stitched & must remain very flat. The stiffness is achieved by a product called Timtex & is sandwich between the top & the back is marked as a 'Postcard' from a rubber stamp used by the card making suppliers. It's a fun small projects to share & I'm sure the postal workers delivering them get a smile too!
St. Patty's Day
I was taught the love & excitement of St. Patty's Day at an early age from my grandmother, on my mom's side. She was of an Irish descent & use to tell me stories of the St. Partrick's parade that use to take place & how her father would take the horses & braid green ribbons through their tails. She was very much Irish...in fact 'Irish' is what she called the kitten I gave her years ago...as the kitten had green eyes. Grandma's been gone a long time now & is fondly remembered by me... particularly on St. Patrick's Day.
I had made another one of these wall-hanging's from the Quiltmaker Magazine & gave it to my father-in-law, as he too is Irish & just loved the wall hanging, he displays it proudly in his living room. You've gotta love the Irish!
Thursday, March 10, 2011
Remembering Mitch's Quilt...How did I make that?
This quilt did help bring the stash down on the Thimbleberry fabrics & the awareness up on how little I had in lights fabrics...wonderful scrappy quilt, one of those 'one block wonders...design is formed from only one block!
Mitchell has been bring laundry back home to borrow the washer & drier & my folding skills... to complete & get his laundry out of my laundry room. He's been in the process of painting & replacing the flooring in his laundry room for over a month. Recently he brought over his quilt that I made him in 2007 & wanted it washed, he said it's only been in use for 6 months. Well I washed it & dried it...then marveled at the new beauty of it's softer look all quilted up, Beth Michilitis you did a wonderful job on the long-arm!
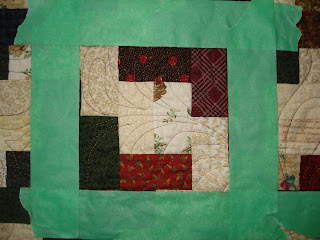
Now how did I do that pattern? it was so simple & a fast work shop that I had taken at the Thames Valley Guild years ago...where was the repeating block? the more questions I asked out loud, the more curious my husband & son became...well Mitch found the block & Bill got the trusty painters tape out to show me the block. I got the measuring tape out to see the size of the pieces that were pieced together. This is a quilt I will make again...maybe in brights, al spring & summer bloom colours!
Looking at the quilt I laughed as the double piano key border as that happened by mistake. Getting carried away, I added one more round on top of the previous piano key row & loved the look. So I finished it in the double...sometimes mistakes do work for the best!
I could not see the block...
Yes! now I see the block...
Here's how I did it...
- 3 1/2" length by 2" width (the finished square is 3" by 1 1/2"), cutting the same number of lights as darks. You, too, may be surprised. Do you have more darks or more lights in your stash?
Sew the length of two lights together, then add a dark on each end, add the outer, making sure the darks are together, meeting at the end, and viola! Keep this block next to you, then begin chain piecing to speed up the process. Many, many blocks will be needed.
Bring the dark corners together, and the pattern will form. A design wall is helpful with this process.
After making that many blocks...one would think that you'd remember!
Good memory...not long!
Sunday, March 6, 2011
March has arrived!
I added the March saying myself & hung it from the tree branch... now I see a March calendar banner!
April's is so cute I cannot wait to do it!
O-P-Q Snowmen A to Zzzz
Subscribe to:
Comments (Atom)


