This has been a productive week for me & Durelle Construction.
It's a long blog full of photos, so go get your favourite beverage & settle in for the viewing. :-)
The sewing of this quilt has calmed down the stress levels & I love how it turned out!
And it was done with the help of Rexton the Manx Cat. She has missed the sound of the sewing machine & stayed with me through the process.
The quilt blocks were to be placed in an eye pleasing matter...just what I did not want to do. I wanted to sew & not think of making a decision as all my energy had been used on the renovation & finding the flooring that week. So I laid out the 70, 8 1/2" blocks on my queensize bed & viewed it...then took a picture to see it from the camera lens. Yup! Too many pink stripes together!
Now that is better & I walked away & returned to my bedroom at 10:30pm to find it still on the bed...just as I had left it! The choice was to sleep in the guestroom or sew it together. I sewed till 12:45am & it was now one piece. One lovely Midsummer Quilt, done in the Faded Memories& Aviary fabric by 3 Sisters.
I knew I had to do it that night, I can't even sleep on Bill's side of the bed, such a creature of habit!lol
To support the fabric as the quilt grew as it was sewn together, I moved the bench at the end of the bed. And with it came Rexton, refusing to move from her warm spot.
Her ears went back to show her disapproval but she would not move off the bench.
I hung the finished quilt top up, over the door to admire it as I turned out the lights & went to my spot in the bed. Rexton & Mr. Boots joined me for our trip to Night, Night.
Scrap Fun~~~~~~
What to do with these wee scraps?
I had purchased a meter of extra wide muslin & washed & ironed the wrinkles & stiffness out of it.
It showed the fabric beautifully in this mini coin quilt. Scraps that most would through out, I have such fun playing with them & making 'Something From Nothing'.
I've been playing with the alphabet lettering on my Quest 2008 Babylock, dating it with the year.
I also added a wee flower design down & around the muslin sash.
The pedestal & dome sit nicely upon this wee quilt.
For the three cats, this is a regular mid morning at the Carroll Cottage. Lots of napping is needed after their morning breakfast, giving me free time to do some more sewing. :-)
This pillow covering with the leftover Aviary charm squares & fat 1/4 scraps.
I made my own piping with coordinating muslin backing, with Velcro closing.
Another Pillow Design ~~~~~~~~~~
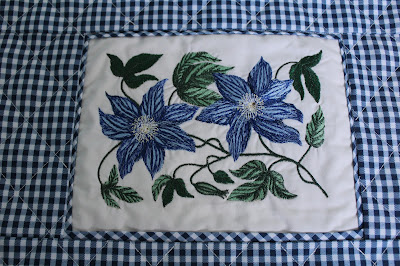
I found this blue & white check fabric at Frenchy's & knew it would look great in the Carroll Cottage!
The embroidered design in the center was done by my girlfriend Liz. She put together a bunch of her designs that didn't quite work for her & gave them to me, for a creative design like this!
Then it needed some quilting & my go to is the painters tape technique - for the diagonal lines.
It finishes the pillow off & doesn't take from the center design & will wash beautifully.
I used washed flannel on the backside of the quilting, it creates a soft full top on the cushion.
I also added a bit more detailing to the center by using a 1" piece of fabric, cut on the diagonal & then folded in half. See how something so simple can give a more detailed finish to the design?!
I'm thinking of adding yellow beads to the center of the Aster Flowers. The Aster flower is my September, birth month, flower. I'm seeing wild ones everywhere right now. September is just around the corner!
The blue & white dishes are all through the kitchen at the Carroll Cottage & this pillow will fit in beautifully. Thank you Liz, I enjoyed playing with your embroidery piece!
To make the bias tape, I used cotton kitchen twine. With the hindsight of a miserable finding when I had made the toile chair covers years ago, with purchased ready made decorative bias tape. I washed them & the cotton cord shrunk inside, puckering the look of my lovely chair covers...horror, now hindsight. Boil your cotton cord!
I cut off the needed amount of cotton twine, boiled the kettle & placed the twine in a cup & added the boiling hot water. I left it to cool, then placed it in the sun to dry. Now it was ready to use.
I used 1" strips for the outside design as the twine was tiny to cover & using a 1/4" seam, it was the measurement I needed. A zipper foot is needed to do this technique, making the seam tight to the fill of the twine. You can create a real designer look for very little cost, just a bit of your time.
I'll show the complete pillow next post.
Rug Hooking Update
As I hooked down the rug, I was always thinking, what design was going to be at the bottom?
The year it was made of course, the Roman numerals MMXVI, for 2016!
OK Enough Creativity... Now The RENO!!
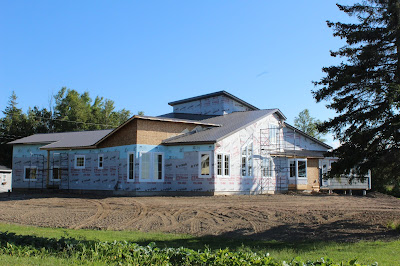
The roof is completed & the brownish grey coloured eaves & fascia is being added around the outline of the design.
This is my favourite view of the house, The view through the two large pine trees. The exercise window & the upper studio window are now installed!
The view between two other pines,all these windows face the shore side.
I walked out the backyard took this picture, then I turned around & took this picture...
This is the backyard & I look forward to sharing it next year with friends as they come with their trailers & motor homes. Bill is so at home with this haven we live in. Staying at the Carroll Cottage, I miss the wind & the sunsets over the water. You really don't know what you have till it is gone.
The sun porch will be getting its much needed support soon.
The new coloured eaves & fascia are being added as the white ones are removed.
Let's Go Inside!
The sewing room is getting closed in with chip board. Next week the drywall is going up!
The exercise room, the new windows really set it off!
The master bedroom now has the ceiling insulation blown into it.
The kitchens dining area is so light & bright, the flooring has been chosen & is standing up on the display board, it too is light & bright. The French Garden doors take you through to the sun porch.
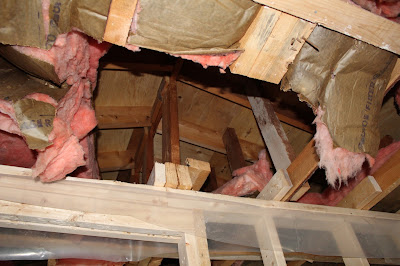
Upstairs in the stained glass studio, you can see through the walls at all the blown insulation, on the main floor.
The stained glass studio is coming together, all plumbing is in & electrical nearly done.
This center support beam will have outlets installed for the work areas that will spoke out of it, creating an open feel when using the work areas.
This will be used for the glass storage & pattern storage.
The guest wing, the hall way has been opened up & the door will now be centered.
I was surprised to see how little the attic space there is!
The guest room will finish approx. 12' x 16', with a 6ft. closet for linens/clothing.
Another one of those 'Mike Holmes Episodes, with no support for the original mezzanine, now with its temporary support. Vanities & wash tubs patiently awaiting in cue, to be installed.
The great room RH chandelier will be the inspiration for the next light in the main foyer. The same light but in a different metal finish.This design works well in rustic & modern settings.
As I descended to the basement I noticed all the shiny metal vents, going to the second story & smiled as once it is covered with drywall, I know what will be keeping me warm this winter. :-)
And that evidence was for sure in the basement!
The furnace will soon occupy the area between the two openings. A warm feeling after baseboard electric heating. Everyone tells me I'm going to enjoy the warm & the $$$ you save with geothermal.
The old & new, joined together for the septic system. Kinda looks like a sculptural piece. lol

The whole house has been rewired & awaits for the installation of the new 400amp box, It will be brought in underground from the pole. No lines around the house.
The garage is looking huge with all the wooden lines in it.
It reminds of yesteryear's of my time together with my Dad, in airport hangers, when he had his Stenson 108 plane. And you wonder where my need for speed came from! lol
For now the garage is a hub of trades working in it.
This is a view of my neighbours but I did the photo to show where the wells are, to the far left & the far right. They must be 50-60 feet apart. We needed two because of the geothermal furnace.
The porch to the laundry room, a clothesline will be installed from the porch. Oh the fresh shore breeze those clothes will have! The garage windows have been installed this week. They were the sewing room windows that were installed a couple of years ago. It will allow brightness into the garage when it's closed up.
Oh the outside view, as you walk around the perimeter of the new addition. I'm going to like it here!!
The elevator shaft, looking from the basement. The front foyer door entrance is covering the elevator door area. In October, our boys, Don, Mitch, & Nick will be flying in from Ontario & Alberta to install the 4 stop elevator, with their Dad supervising. Nicole & I will be shopping...lol
How modern of a design is this? I've lived in a century home since 1980. I would never in a million years have dreamed the life I'm living today. I'm living in a dream... living the dream!
Thank you for joining in my dream life. I hope you enjoyed yourself & will be visiting again soon.
It is ever changing & I can't wait to start the decorating & the moving in of the furniture as the Hardwicke House is completed this Fall.
Live is always evolving for me. What a blessed life with Alberta/ Ontario/Quebec/USA family & friends & now the new Maritime friends, life is good!
This year started off quite sad with the death of dear Eva, my mother-in-law, followed by the death of Boris-Loree, my faithful companion for over a decade. I understand no one, living thing, is immortal but the sadness when you have the void & the happiness when you have those memories.
I guess that's why they say - 'You only get sad, to be glad again'? Seasons later & these days I'm very glad!
Have a safe & happy week, be glad!


